Create Message Template Dropdowns
Supervisors only
This topic describes how to create message template dropdown options for use in your message templates. See Create a Message Template for information on how message template dropdowns are used.
The topic also covers the following related tasks:
Edit a Message Template Dropdown
Delete a Message Template Dropdown
Procedure
- In the Toolbar at the left of the DTA main application window, click the
 button to display the Settings Window.
 - In the Settings Window, select Message Templates .
- Select Dropdowns.
- On the Template Dropdown page, click the
.png) Add Dropdown button.
Add Dropdown button.
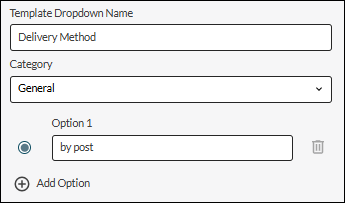
- Type a name for the new dropdown in the Template Dropdown Name field and then select the category for the new dropdown. If there are no categories to select, the dropdown will be placed in the default 'All' category.
Type the first option in the Option 1 field exactly as you want it to appear in the dropdown list when seen by agents.
- Click the Add Option button to add the second and subsequent options.
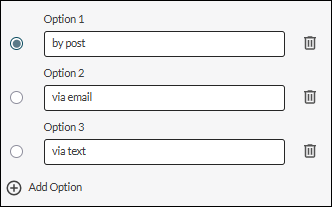
Click the option button next the dropdown that you want to make the default option. The selected dropdown will be selected automatically for the user of the template. If you do not select an option, then Option 1 will be marked as the default when you save the dropdown.
- When you have added all options, save the dropdown by clicking Add.
The new dropdown is now included in the list of dropdowns and ready for insertion into any new or existing message template.
- If required, create more dropdowns by clicking the Add Dropdown button.
If you have a large collection of template dropdowns, consider organising them into categories.
Edit a Message Template Dropdown
This allows you to change the name of a dropdown, assign it to a different category, or to change its option items.
- In the Toolbar at the left of the DTA main application window, click the button to display the Settings Window.
- Select Message Templates and then Dropdowns.
- Click the
 Edit button next to the template dropdown you want to edit. If, in a long list of dropdowns, you know the name of the dropdown, find it quickly by using the search field.
- If required, edit the name of the dropdown and/or select a different category.
Note: a template dropdown can only belong to a single category at at time — selecting a different category will remove the template from its current category.
Click Add Option to add a new option, or  Delete to remove an option.
- Click Save.
Note: agents must log out of DTA and then log back in to see the effect of this change.
Delete a Message Template Dropdown
Deleting a template dropdown means that it will not be available for selection in new message templates. Any instances of the dropdown in existing message templates will not be removed.
- In the Toolbar at the left of the DTA main application window, click the button to display the Settings Window.
- Select Message Templates and then Dropdowns.
- Click the Delete button next to the template dropdown you want to delete. If, in a long list of dropdowns, you know the name of the dropdown, find it quickly by using the search field.
- Confirm the deletion.
Note: agents must log out of DTA and then log back in to see the effect of this change.
See Also
Create Template Dropdown Dropdown Categories (supervisors only)